Tag Archives: fried chicken recipe

Buttermilk Fried Chicken Recipe at American Gourmand

Facebooktwitterredditpinterestlinkedinmailby feather
From Homemade Rendered Lard

I’ve just launched a new blog called American Gourmand that I am super excited about!

American Gourmand is going to be a sister site to Nola Cuisine but exploring other realms of the American culinary landscape like Barbecue, Sushi, Charcuterie, and whatever else may be simmering away here in our great melting pot!

From American Gourmand

The format will be identical to that of Nola Cuisine, recipes as well as sharing my visits to restaurants, both of which with food photos that I hope will make your stomach rumble.

I’ve also streamlined the themes and lay outs of both sites to be almost indentical, to make it easier for me to post more often, rather than spend time messing around with technical issues.

I kicked off American Gourmand with a recipe that readers of Nola Cuisine know is near and dear to my heart, Fried Chicken. Here is the recipe:

Buttermilk Fried Chicken Recipe

I’m going to Nashville next week and hope to bring a bevy of Southern goodies back to share! See you soon!!

Be sure and check out my ever growing Index of Creole & Cajun Recipes which provides links to all of the recipes featured at Nola Cuisine as well as my sister site American Gourmand!

Facebooktwitterredditpinterestlinkedinmailby feather

Homemade Rendered Lard

Facebooktwitterredditpinterestlinkedinmailby feather
From Homemade Rendered Lard

Lard…the four letter word. Like one of my other favorite four letter words, if used in moderation, it can add emphasis and an added oomph…and let’s face it, sometimes, just sometimes, there is no other word that can be used that will properly express your feelings as well as that four letter word.

Lard makes things taste good. I’m going to repeat that, because it bears repeating. Lard makes things taste good! That is all I’m really concerned about here on Nola Cuisine, making things taste good, and making people happy with food, and by people, I mostly mean me and my family. I share my thoughts and hope you enjoy them too.

Lard makes things taste good, when things taste good, they make me feel good, when I feel good, it lowers my stress level, and believe me, the stress is going to kill me far before the lard does.

I use lard in moderation mind you, I’m not condoning cooking every meal in lard, but when you’re making that Sunday supper of Fried Chicken…nothing is going to make that crust crispier or more flavorful than lard (unless maybe you add some bacon fat as well.) If you only make Pies once or twice a year and you KNOW that Leaf lard makes THE BEST pie crust, why not use it? How much is each guest going to have? One Piece? Two? If this were a pie eating contest you should be concerned. It’s not. Use what yields the best results.

When talking about lard, I’m talking about homemade rendered lard. I don’t like the stuff they sell in the grocery store, which is a mixture of lard and hydrogenated lard. It tastes funny in my humble opinion, it has a chemical like aftertaste. I’m not a chemist or a scientist, I don’t know what the hell they do to hydrogenate fats or oils (by the way I don’t want to know, for the comments section…kinda kidding). I do believe however that the processed foods are the foods that are killing us, or better said that we’re killing ourselves with. I’m not a crazy organic guy, but lets be honest, we’re killing ourselves with all of this mass produced crap. We really are, I’m no exception.

Make your own lard. Use it for special occasions, or for your favorite dishes where it applies. Use it in moderation and ENJOY it! Don’t stress about it! Enjoy life! Our culture has us stressed about everything under the sun, we’re afraid of our own shadows for God’s sake…it’s ridiculous. The dinner table is really our only place to relax (when we can even make it there), so when you sit down at the dinner table, relax! Free your mind and indulge in GOOD cooking and good company!

Here’s how to make homemade lard, the same application applies for duck fat…another post. (Stepping off of my soapbox)

How to make homemade Rendered Lard

2 lbs. Clean Fresh Pork Fat cut into 1/2″ cubes (I usually use back fat because I can find it locally. Leaf Fat is the best and is preferred for baking purposes)
1/2 Cup water

Some important notes:

*Use only CLEAN, FRESH fat. If the fat has an off flavor, your lard will have an off flavor. The fresher the better! I get my pork fat from a polish butcher here in Michigan where I live, who, by the way, also has a ton of house made rendered lard for sale! The polish word is “Smalec.”

*Cut the fat into equal sized pieces, this helps to prevent some pieces from geting too brown before others, which will give the lard an off flavor.

*Remove all lean meat from the fat before rendering.

*1/4 cup of water is added to the pot for each pound of pork fat. This keeps the fat from burning or browning in the pot, before the fat starts rendering. The water will evaporate away.

The Process:

Add the fat and water to a heavy bottomed pot or dutch oven:

From July 18, 2011

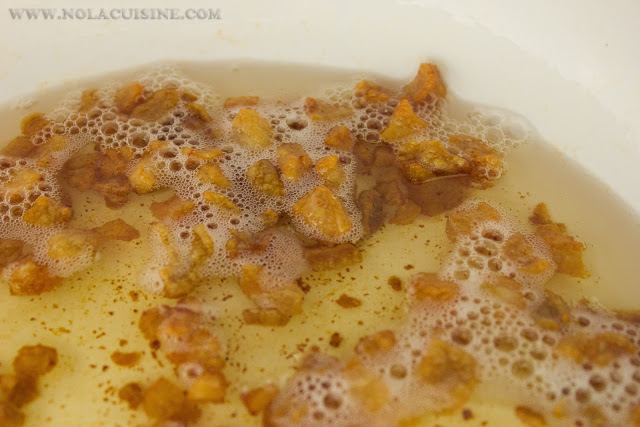
Cook the fat and water at medium-high heat until you start to see the fat really start to liquify in the pot, turn the heat to low. Cook slowly for 1-1/2 to 2 hours. Your lard is ready when the remnants in the pot, now called cracklings are golden brown.

From July 18, 2011

Strain the cracklings in a fine mesh strainer, obviously reserving your beautiful golden homemade lard.

From July 18, 2011

Drain the cracklings on paper towels season them with salt and snack on them, or use them to make Crackling Corn Bread!

From July 18, 2011

Place into a clean, dry container, I use a French Market Coffee can, and store in the refrigerator for at least six months. Use to make Fried Chicken that looks like this and tastes even better!

Buttermilk Fried Chicken Recipe

From July 18, 2011

Be sure and check out my ever growing Index of Creole & Cajun Recipes which provides links to all of the recipes featured at Nola Cuisine!

Facebooktwitterredditpinterestlinkedinmailby feather

Southern Fried Chicken Recipe

Facebooktwitterredditpinterestlinkedinmailby feather
From Nola Cuisine

I had a taste for Southern Fried Chicken last night, so that is what I made. Sometimes you need to scratch your own itch, and boy did I do some scratchin’ last night, this was the best batch of Fried Chicken that I’ve made to date. Perfectly seasoned, crispy as heck, tender and juicy on the inside. Hey sometimes we need to pat ourselves on the back too. 🙂

This recipe is a combination of Austin Leslie’s Fried Chicken recipe and my Mom’s. My Mom really taught me how to fry chicken well, she showed me how to turn it often to prevent over browning, and how to know when it’s done. She makes it so well that I often get cravings for it, like the one I had last night, and Dad says that it would be his last meal request if ever facing the firing squad.

Here is my version of what I’ve learned so far about Fried Chicken:

Southern Fried Chicken Recipe

3-4 lbs Chicken parts, I like legs because that’s what Mom always made, plus it’s hard to dislike food with it’s own handle.
Water, enough to cover the chicken
Kosher salt, enough to make the water taste salty (obviously tasted before adding the raw chicken.)

Peanut Oil for frying, enough to fill a large cast iron skillet about half way

3/4 Cup Flour
4 Tbsp Kosher Salt
2 tsp Freshly ground Black Pepper
1 tsp Cayenne

Combine the water with the salt, submerge the chicken and let sit in the refrigerator for 6-8 hours. This will help make the chicken more tender and add flavor.

After the time has passed drain the chicken and pat dry with paper towels.

Place the flour, salt, black pepper, and cayenne in a paper lunch bag. Mix well. Add the chicken two pieces at a time, shaking to coat well with the seasoned flour, shake off the excess. When all chicken is floured, set aside for twenty minutes before frying. This step will help make the finished product more crisp.

Heat the peanut oil to 360 degrees F. Fry the chicken in batches, turning often (about every ten minutes) so that it cooks evenly, and doesn’t get too brown too fast. Try to fry equal sized pieces in the same batch. When the chicken looks close to being done hold it with tongs and pierce (be careful; the oil will sputter) with a carving fork, then squeeze to let the blood out (a la Austin Leslie). Cook until done. If you’re not sure if it’s done, dig into one piece with your tongs, down to the bone to see if it is cooked through. It should take about 15-20 minutes per batch. Drain on paper towels or a wire rack.

More info on Fried Chicken:

Buttermilk Fried Chicken Recipe at American Gourmand
Austin Leslie Bio
Austin Leslie’s Fried Chicken Recipe

Be sure and check out my ever growing Index of Creole & Cajun Recipes! Visit my other blog American Gourmand!

Facebooktwitterredditpinterestlinkedinmailby feather

Austin Leslie’s Fried Chicken Recipe

Facebooktwitterredditpinterestlinkedinmailby feather
From Nola Cuisine

This is part 2 of Great Chefs of New Orleans: Austin Leslie, which I’ve been working on with my friend Texas Chef Bill Moran. Like I said, with each Chef we feature, we will include a recipe that he/she is most famous for, in this case Austin Leslie’s Fried Chicken.
A lot of people think Austin Leslie had a secret ingredient, heck, maybe he had a little secret, but I believe his main secrets were patience and knowledge.

The following passage about frying chicken by Austin Leslie is from the 1978 book Creole Feast by Nathaniel Burton and Rudy Lombard:

“The first time I cut up a chicken I was working at Portia’s. The chef there , Bill Turner, asked me where I learned how to do it. I said I learned from my mother at home. He taught me how to get twelve pieces from a whole chicken; my mother was able to get thirteen pieces from the same chicken because she broke the back into two parts. I learned all about fried chicken from Bill Turner, too. It’s the easiest job in the kitchen. You can tell by the sound when fried chicken is done. If you listen to it, you can hear how the sound of the grease crackling in the fryer changes. Then you know it’s time to bring it up. I never cook it well done; I never cook any meat well done. What I do is take the blood out of it first-while the chicken is frying, take a pair of tongs and squeeze each piece. Squeeze it till it bursts to let the blood out. You can look right down there by the bone and see if there is any blood there. When it’s ready the chicken will float to the top, a part of it will stick up. Then you take it and check it over. If you cook it properly you can keep your guests or customers from ever seeing any blood. That’s what they object to, when they prefer well-done meat-not the taste, but the blood.
If you’re serving fried chicken to twelve people you will need three chickens so you can provide three pieces each. The wings-two pieces; the breast-four pieces; the back-two pieces; the thighs-two pieces, the leg-two pieces; that’s twelve in all. Since people want to handle chicken easily when they eat it, we cut it that way. Actually we can fry it just as well in larger cuts. When you cut it properly you won’t loosen the skin. You start by cutting it down the back. Split it down the middle. Then take a sharp cleaver and place the chicken firmly on a block and hold it down. After you split it down the back, then you open it up and take out the insides and put them aside. Then you cut straight through the breast. Cut it into quarters with the cleaver, seperating the thighs from the breast. Then disjoint it at the wings, and disjoint the legs from the thighs. If you use a cleaver, be careful. If you use a knife, always cut away from yourself. Always move all other knives away from the board when you use a cleaver because you can mis-strike, and if that cleaver hits a knife, it can jump up and hit you.
After the chicken is cut up, salt and pepper it, mixing the pieces around so the salt and pepper get all over the chicken.
If you are preparing the chicken to be cooked later, don’t do what they do in markets-cover it with plastic wrap or wax paper. If you do that and then put it into the refrigerator, some of it might go bad. The best thing is to put the seasoned chicken in a bowl uncovered. That way the cold air can get call around the chicken and keep it fresh. The next step is to make an egg wash. Use any kind of cream-for one chicken, use one egg and half a can of evaporated milk. Add some salt and pepper, stir it up, put the chicken in and let it sit. Put enough flour to cover the chicken either in a bag or in a flat bowl and coat the chicken with flour. If you use an electric fryer, set it at 350 F, if you pan-fry, wait till the oil is beginning to bubble. I use peanut oil for frying. Put the heavy pieces in first (thigh, leg and breast), making sure you don’t crowd the chicken. If you put too much in at one time the heat and oil can’t get all around the meat and it will cook unevenly. You have to watch the flour that falls to the bottom of the pan very carefully. After each set of pieces gets done, strain the oil out and clean the pan, otherwise the flour at the bottom is going to burn. You’ve heard people say the first chicken looks good, the second so-so, and the third you can forget. That’s why. Never fry anything else (meat, fish, or sausage) along with the chicken, because it will give it a bad taste. It’s like frying hot sausage on a grill and then following it up with steak or ham. You see that a lot in restaurant kitchens and that’s why the food has a strange taste. You can’t cut up a lobster on the same board you use chicken or some other meat.” -Austin Leslie

The above pic is my recreation, using the instructions at the bottom of this page and following the recipe. It may not have been Austin Leslie’s, but it was a damned good plate of Chicken. Here is the recipe:

Austin Leslie’s Fried Chicken with Persillade Recipe

1 ¼ Cups Peanut Oil for frying
1 3-3 1/2; lb Fryer cut up (see above)
Salt and Black Pepper
1 Egg, lightly beaten
1 cup Evaporated Milk
1 cup Water
½ Cup flour

Garnish:
4 Tbl fresh minced garlic
4 Tbl fresh minced parsley
Dill Pickle Slices

Heat oil in a cast iron skillet to 350 F, the oil should come about halfway up the sides of the skillet. Adjust the amount in accordance with the skillet size. Combine garlic and parsley (persillade) in small mixing bowl and set aside.

Wash chicken pieces in cool water, pat dry with paper towels and sprinkle with salt and pepper. Set aside.

In a medium mixing bowl, whisk egg, evaporated milk and water. Season with salt and pepper. Place flour in a separate bowl. One piece at a time, starting with heaviest pieces, dip chicken into egg wash, squeeze, dip into flour and place gently in skillet. Do not overcrowd skillet.

Maintain temperature of 350 F. Use tongs and long fork to turn chicken often for 7-8 minutes. Remove chicken from oil with tongs, pierce with fork and squeeze. Place chicken back in oil approximately 7 to 8 minutes. Chicken is done when no longer hissing and juices run clear. Remove from oil and place on paper towels to drain. Immediately top with a sprinkle of garlic and parsley mixture. Continue until all the chicken is cooked.
Garnish each piece with a slice of dill pickle.

Related links:
Buttermilk Fried Chicken Recipe at American Gourmand
Austin Leslie related links:
Great Chefs of New Orleans: Austin Leslie
Austin Leslie Obituary at Egullet (Pictures)
Jason Perlow’s pictures from Jacques-Imo’s and Pampy’s Creole Kitchen
Pictures of Austin Leslie’s Jazz Funeral
Austin Leslie Obituary thread at Mr. Lake’s Nonpompous New Orleans Food Forum.

Facebooktwitterredditpinterestlinkedinmailby feather